Wednesday, 16 May 2012

Carpentry Class: Term 2, Week 3

I left my run a bit late this week. Admittedly I have had many many other things on my mind, and pulling apart another pallet hasn't been high on my list of priorities.

So after realising early this afternoon that it was indeed Wednesday - how it got to this late in the week already is beyond me, quite frankly - I started wondering out loud about exactly what I could make tonight.

I trawled through the plan catalogue on Ana-White.com and decided on this 'Vintage Step Stool' - something for the kids to use to help with baking and cooking in the kitchen. Heres hoping it's not used more for reaching the biscuits from the top shelf instead!

So, after a quick visit to Mitre 10 Mega, I had some dressed pine and a large tub of 50mm screws. I decided I'd just use the last piece of ply I had sitting behind the door in the hall way for the sides.

Vintage Step Stool

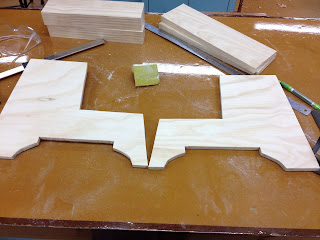
All the cuts done

Safety first people - ear muffs and protective glasses before we have fun with the bandsaw ;)

I managed to lose my pencil (ok - I lost it last week, and forgot to find another one) so it had to be pen to mark out where to cut. 2 pieces of ply stuck together to cut the identically.

Oooooh! Bandsaw!

10 minutes later - all cut out. Apparently I'm a 'wildcat' - quote from Robert there haha

Oops - I forgot you're not supposed to file your knuckles - just the wood!

Two sides all ready - filed and sanded.

The two bottom supports attached

The two top supports attached as well.

I really could have kicked myself! I picked up the wrong width of pine for the tops of the steps! So I needed to improvise. I used ply instead. It looks OK, but I'm not as happy with it as I hoped I would be. Never mind - kids won't care!

All done - side view!


I need to figure out what I'm going to make next week. This took only an hour and a half - and had I not needed to wait for the table saw to make the cuts for the tops of the steps after realising I had the wrong size, it would have been about 15 minutes less! Super-easy project, but will be very handy in my kitchen!

Monday, 14 May 2012

Long time, no blog

Back, by popular demand (or something similar haha)!

It has been a while since I last blogged, and to be fair, it feels like a long time since I did much worthy of blogging about.

I am almost at week 3 of the 'Intermediate/Advanced' Carpentry course at LPHS - I'll tell you about what I made in week one and two shortly.

I'm thinking back right now, trying to remember just exactly WHAT I have done in a little over a month that has been handy. In the last three weeks, I have discovered a new love - the gym! Those of you know know me well, will know that the gym and I have never been good friends, but I have been going 4 times a week, and have lost 6.2kg in that time! That is very exciting, I'm down to a size 16, probably for the first time since I *was* 16!

Red turned 2 on Easter Monday, and she has started kindy, the big kids are back at school now after the two week school holiday that followed on after Easter. And the biggest news of all, The DIY-Impaired husband is moving out next Monday, after a long time of us not being terribly happy together. We remain friends, and he will be living close by, but for the foreseeable future, it will be the kids and I. Good thing I'm no weak woman ;) And yes - I'm totally fine about this! I don't need any sympathy :)


Week 1 and 2 of Intermediate/Advanced Carpentry Class


Carrying on from my last carpentry class post, when I had pulled apart that pallet, taken it to class and dressed the timber, I used it in the first class of term to start making a headboard for my Red. It took 2 weeks classes to complete (4 hours all up) and again, was a learning experience, but I'm pretty pleased with how it came out! There are things I would probably do differently next time - and there WILL be a next time, because I need one for my big girls bed as well!


Week 1


Nailing the frame together


Uh-oh, a wonky nail!


The two bottom boards are on, and I decided to put a wee shelf on the headboard too, for keeping a drink, books, little treasures etc on. 
This pic is the shelf in position, clamped on, waiting to be screwed on.


And another angle!


All screwed on - this did make it much less easy to attach the other boards of course! 
Improvisation in the form of clamping the frame to the work bench was used after this park was done.


The finished headboard, before legs and finishing were done.


And another angle!


Week Two


Legs going on!


Somewhere between drawing up my plan originally and the first week of term 2, it went walk abouts (possibly something to do with having 3 children?) So I needed to draw something else up quickly before T2,W2 so I knew finished measurements, and placement of screw holes to attach the headboard to the bed. This was my rough plan I drew up before class, when I was scrabbling about behind the bed measuring spaces for screw holes! THEN I found I misplaced my pencil! 


The finished product! I need to stain or varnish it now - so it still isn't attached to the bed, but I want to protect it from Miss Red and her drawing skills first ;)


So there we have it! I am quite pleased with it really, though, I know there are a few things I would do differently for the next one.

Week 3 is this Wednesday, so I really do need to get out there and pull another pallet apart, as I'm in need of another 3 slats!