Tuesday, 20 March 2012

Tuesday, Carpentry Day

I do believe that Tuesday has become carpentry day.

I made a flying trip to Mitre 10 this afternoon when Red woke up from her sleep. I bought a pack of 38mm screws, a large spring (the type you put on a gate to make it self-closing) and a twin pack of hooks and eyes. We made it home just in time to walk around and collect the big kids from school.

When all 3 of them were happily playing, I took myself out to the gate (yes, again), and attached the spring brackets and spring, then tightened the spring so it will close the gate once it is opened. It took a little trial and error but I think I got it just perfect. Then I attached the eye to the gate and the hook to the fence post. This is for when we actually need the gate to stay open for any period of time - say for bringing something large in or out.


Self-closing spring and hook and eye on the gate.

Carpentry Class #6


The mood in the class tonight just seemed a bit off for some reason.

I ended up crawling around on the floor screwing my seat together, which wasn't terribly comfortable, as this morning, walking home from music and movement group with Red on my back in the Manduca, I rolled my ankle and skinned my knee. My ankle was fine about 3 minutes later, but my knee has been stinging the rest of the day.
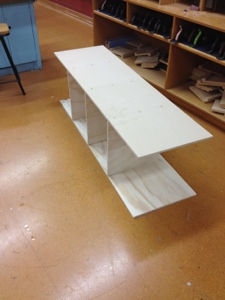
It actually started to look like something tonight!

A rather large annoyance tonight, was that there were about 4 drills in the room, but only one had a partial charge that was useful enough, the rest were so un-charged that they were next to useless. I did see that there was a spare battery for one drill in the charger, but the charger wasn't plugged in! I would have thought that they would have charged them over night so that the school Wood Technology students could use the the following day. Being me, I plugged it in, and when the partially charged drill (which was being shared by 3 people!) pretty much ran out, I figured I had nothing to lose by at least trying the charging battery, which at this stage had been charging for about 15 minutes at the most. Imagine my surprise when it actually seemed to have a bit of oomph behind it! So I managed to get the seat looking like a seat tonight!

7 pieces of wood, 30 screws and some glue. Now looking a lot like it is supposed to!

I actually left a bit early tonight. Really, I couldn't do much else. I did think about taking my own drill this week, but it didn't happen. Next week I will make sure I do. And I will make sure it has a full charge in it too!


I am thinking now that I won't put the fancy looking feet on it - they just don't look sturdy enough and I don't have enough ply (in one length) to make fancy bits for the front and back. I think it will be better for the girls at the height it is now too - it will eventually have a squab cushion on the top of it too, which will give it more height.


More Planning


This afternoon I had the kids help me do some measuring.

I am in the very early planning stages of a play fort for the back yard. I established that it needs to be 1.5m from the back fence and probably 2m or 2.5m from the hedge along the side boundary. I think it will be between 1.5-2m square. It will be raised, underneath there will be a 'storage cage' for all the outside toys - bikes, ride-ons, naughty children (haha!) etc) Up on the platform, I want to build a really cool, functional play house, with a deck. There will be a slide to come down on. I also plan to put a large beam out from the side, with an a-frame at the other end, and I plan to attach 3 swings made from old tyres, suspended by chains.

I'm really excited about it! But I think it will probably cost an absolute bomb!! The kind of wood I will need isn't cheap! But the kids will have such a lot of fun in it!


Tools

I managed to win a Trade Me auction for a jig saw last week - $30! It arrived on Friday, but I didn't get to open it straight away as we had a very busy Friday and weekend. When I did open it, I was amused that a spider came crawling out! DIY-impaired husband, who is also scared of spiders, was not so impressed. I may have to employ spiders to guard all my power tools from him in the future!

Wednesday, 14 March 2012

Carpentry Class #5

Last night went FAR too quickly! I came home absolutely covered in white sawdust. It was fantastic!


So after cutting almost everything I needed last week, last night I got to use the table saw all by myself to cut the last piece (MDF for the top, as it won't be seen) That was great fun!

I spent most of the rest of the night sanding. First I was using the belt sander, then I finished off with hand sanding - I actually preferred the feel of the finish it gave after I had hand sanded.

I made a bit of a mess...

I got FILTHY!

I drilled holes ready for screwing the seat together next week. *Note to self, remember to sort out screws for next week!*

Two boards clamped together, marked and holes drilled ready for assembly next week.


Second Carpentry Class

I have realised that I didn't blog about my second week of carpentry class - when I finished my cooling rack/trivet.

I can't remember exactly, given it was 3 weeks ago, but I remember I drilled holes then spaced out the slats and then nailed it all together. When I brought it home, I oiled it, and I have been using it at dinner times when I have a hot dish out of the oven to put on the table

My first project, complete!

More on the gate!

Yesterday morning I didn't manage to control myself in the swearing department when I looked out the window before I took the kids to school. My gate was lying on the footpath!

I knew that the bottom packer had split a bit when I screwed it on, but I had hoped for the best. So before I met my Mum for lunch yesterday, I hot footed it to Mitre 10 Mega and bought a 650mm piece of treated decking timber (the same stuff I used on the gate frame). When I got home, I broke out the circular saw, cut off a 1 inch strip, then attached the remaining length to the gate post. I then attached the hinges to it - one gate, hung, better be for the last time, or I'll spit!!!

Right, gate, thats the last time I hang you!

With the 1 inch length I cut off, I screwed that to the opposite gate post, on the outside, as a stop. With the child-proof magnetic latch, when it is closed now, it closes with a distinctive 'clunk' so I know that it is closed!

The stop on the outside of the gate.

I don't think it will dare come off again! It would have ME to deal with if it did! I have certainly learnt a LOT while hanging this gate!

Monday, 12 March 2012

Front gate: Done!

Finally!!! It feels as if we have been without a functioning gate for a month rather than a week at most.

Saturday

After wrestling with a rusty, dull handsaw to cut the angles for the crossbearer, giving up, finding a hacksaw, putting in a new blade, starting it with the hacksaw and struggling with the rusty, dull saw for the rest of the two cuts, I put the crossbearer in screwed it on.

'WOOHOO!' I thought 'I can hang it now!' But my moment was short-lived when I discovered that the DIY-impaired husband had re-measured the gap for me, while I was at Mitre 10 Mega on Friday, and it turned out that MY measurement I had written down was correct, his measurement was 5cm too short. I was rather cross (understatement!!). I could carry the gate through the gap without hitting it on either fence post. I could have cried... but instead I yelled, and he left an hour early for work. Oops. Sorry Mr DIY-impaired.

After I had cooled down a bit, I decided I needed to just cut down a couple of the offcuts and attach them to the fence post then attach the gate to those. However, I was not really keen on attempting that with my saw (incidentally, it was found on the ground in the shed under the lawnmower) so when my Mum came to visit, she came with me to wrangle children and we made another trip to Mitre 10 and came home with some 75mm screws, a pair of whacking great hinges (that came complete with pathetic 'why even bother' screws) aaaand...... a shiny new Mactec (the Makita 'home brand' said the man in the shop) circular saw!

That night, Mum took the big kids to her place for a sleepover, so it was just Red and I, which was just lovely! The next day it poured with rain.

Monday morning

I had to wait to play with it until this morning. I didn't even get it out of the box - very restrained!


Off-cuts, ready to be cut down further to become packers

So this morning, when DIY-impaired husband took Red to her swimming lesson, I got on with it and cut down the bits of wood, attached them to the gate post, then attached the gate to the packers!


Hinges placed, ready to be attached to the gate.

I loved using the circular saw - and upon skim-reading the instruction manual, I see that I can but beveled edges up to 45 degrees too, so that it good to know!

I had to move the magnetic gate latch and re-site it on the fence post and the gate, and now it's all good to go!

All hung and useable! 
Sadly the picket profile isn't exactly the same, but I'm pretty sure our old pickets are pretty original!

The only thing I needed to sweat about, was that when I screwed on the bottom packer, it split! So I may need to do something about that another time, but hopefully it will just stay put for a good long time *cross fingers and eyes*

Now Red can go outside with the big kids and play safely while I cook tea each night! Woohoo!


Manky old gate. I'm going to hang on to it and hopefully recycle the pickets when I get around to making the playhouse that is in the pipeline.

Friday, 9 March 2012

The Saga Continues: The Gate, The (almost) Final Chapter

For the last month or thereabouts, our front gate has been annoying me.

First I had to replace the hinges. This did not work, due to the ridiculously small size of the accessible wood and rusty metal frame, I had to buy silly piddly sized hinges. Unsurprisingly, it came off of these hinges. On the bright side, I had to buy some taps to get some dead screws out, and will now forever own taps :)


These are taps - no, not the kind that water comes out of, they are to remove damaged screws.


Next I replaced the hinges with slightly more heavy duty hinges, and used decent treated screws, made for outdoor use in pine. Then the wood totally split and the entire gate became as what we call 'totally shagged'

The gate is currently leaning precariously against the fence post. We can kind of use it, in a pinch, if it is propped up with a brick and latched to the magnetic childproof latch. Not exactly ideal with a 23 month old Red to consider!

Totally fed up, I went to Bunnings the other day (I actually went in for a sheet of plywood for my carpentry class project) and asked what they could sell me in a pre-made gate, as I didn't really think I had the time to make my own. The man at Bunnings wasn't terribly helpful. They didn't have any. He didn't offer me any other options. So I bought my ply and left.

This morning however, I decided I would go and check out what Mitre 10 Mega had to offer me in the pre-made gate department. Sadly the only one they had was 200mm too small. So he suggested I could just buy the palings and some wood and make one. So that is exactly what I did! Well, sort of.

I had him cut the two pieces of wood to size for me (while he did, I introduced Red to a forklift), he then asked if my husband would be able to sort out the crossbearer himself, I laughed and said that my husband would not be going anywhere near it until it was hung in the gap! He smiled and asked if I had a handsaw to cut it myself. I said I did. He then carried it all out to the car for me and suggested I buy 45mm screws, gave me the bit of paper to pay on. I thanked him and he was on his way! Now THAT is what I call service! Just because I am a woman carrying a small child does not mean I don't know how to weald a power tool!


The back of my car, full of wood and Girl Guide biscuits.

So, home after a morning out to entertain Red, when she was in bed, I went and retrieved the wood from my car. I laid it all out on my bedroom floor in the sun, and got to work. I had screwed both end pickets to the two pieces of framing wood and had started laying out the others to work out the space when Mr DIY-impaired left for work. Soon after I had all of the bottom end screwed on. About then Red woke up and got out of bed and came in to project manage for me.


The beginnings of my new, extra-wide gate.

She looked after my other drill (I decided that taking out the battery would make it lighter for her, and would also just make sure she didn't drill anything she oughtn't, like her own hand!) and tried to put a screw in it as a bit while I screwed the other ends of the pickets on.


Trying to put a screw in the chuck


Lighter without the battery in the drill


Red through the gate offering me some of her lunch

I flipped the new gate over and marked where I needed to cut the crossbearer and went to find my handsaw. But wait... who has moved my saw? It isn't where I left it! In fact, it is nowhere to be found! I called the DIY-impaired husband to enquire of its whereabouts. He said 'it's probably in the shed' Ha! Maybe it is, but that shed is such a shitfight, I'm not taking Red in there to help me find it. He says he will go and find it for me tomorrow before he goes to work. We'll see.


All marked and ready to cut, when Mr DIY-Impaired fetches the saw from parts unknown

I'm very pleased with my gate so far, it looks nice, it's rather heavy - I may need to get some bigger more industrial looking hinges, as I fear the others I bought last week are a bit too piddly. We shall see though.

Tuesday, 6 March 2012

Halfway: Carpentry Class #4

Carpentry class tonight was fantastic! (I have just realised I didn't write about the second class, will do that later)

I started off the class by screwing my tray together, took me about 15 mins (with Robert showing me what he wanted me to do) I had to mark and drill holes and then use the drill to screw it all together and give it one final sand to take off the marks left by the clamp and a few machine marks on the base.


One tray - all done! 
Pine sides and ends, MDF base.
My handle makes me happy, it fit around my fingers jut the way I imagined it would.

After the tray was all done, I broke out my plan, which has had to be altered slightly as I'm now doing it in plywood. 


My sheet of ply, had to be cut to fit in the car. 
All ready to cut even more!


I got to use the table saw to cut the lengths to the correct width, then I got to use the drop saw to cut those lengths to the correct size for ends and dividers. I also used the table saw to cut the 20mm trim for around the top to stop the squab cushion from sliding off. It was great fun using all these machines!

Then I made a template for the 'feet' at the ends, penciled that on to the wood and cut it out with the bandsaw! While trying to clear under the blade though, I managed to take a slice out of it where I wasn't supposed to - bugger it! But it was fixable - Robert buzzed of along the bottom where I had sliced it, so it will be vaguely shorter than first anticipated, but I purposely made it a bit higher, just in case - clever me ;) Then I filed down the rough edges, sandpapered them and then... it was time to pack up and go home. I really really really wish I had my own workshop space right now! I really did NOT want to stop!

I had to make a slight adjustment to the height of the box, just because of the size of a piece of wood that was left, so it has gone from being 450mm high to 440mm high. It was really of no coincidence  - it just meant I needed to make the dividers 440 high as well. 

Robert said that I should be very proud of what I have accomplished tonight - and I am! Others in the class said it was really ambitious and that I was very clever. These things all make me very happy.

Next week I will take in the large sheet of 12mm MDF I have left, which will form the seat part of the box. I decided to make that part from MDF, as it won't be seen, with the cushion on the top. It may yet become the bottom of the box. We'll see :)

Wednesday, 29 February 2012

I figured out Google Sketchup!

After trawling through Ana-White.com a few weeks ago, I downloaded Google Sketchup. It sat in my apps folder until today when I decided to crank it up and give it a go.

After several tries, I got really cross and was about to throw my toys! THEN I decided I should watch a tutorial. Viola! That was SO easy - I had it figured out in no time :)

Inspired by the Easy Three Cube Bench from Ana's website, I managed to draw up my own plans for my own (hopefully) easy FOUR cube bench seat.

It will have 4 different coloured cubes in the cubbys - red and white for Scarlett, pink and purple for Samantha - those colours match their bed clothes. It will also have a foam squab on top - thus the small lip around the top to stop it falling off.

I'm rather pleased with how the plans have come out - lets just hope it will translate well into wood!


Carpentry class number 3

Last night I had my 3rd carpentry class. I came home happy and covered in sawdust! Not to mention smelling of wood :D

At the end of last weeks class, when I had finished the cooling rack/trivet, I started designing the handles for my next class project - a serving tray.

Tonight, I got to use machines again! Whee! First it was the drill press, which I used to drill several large holes in the wood that is to be my handles, then I got to cut out the handles with a jigsaw - this was my first time using a jigsaw - I WANT one!! Noisy little machine, that one, though.

After cutting as much out as I could, I went and filed the handles down the rest of the way. Then I attacked it with the sandpaper. When I was happy with that, I went and cut the curved edges with the bandsaw - Robert (the teacher) said it must have had a new blade put in it this week - I didn't have to remove any burnt bits, and it was WAY faster than last time (not that I was very slow last time lol) Then it was more sanding, finishing etc of the handles, and then I got to plane the edges of the sides and base of the tray. Then it was about time to pack up, so next week, it will take me no time at all to screw it all together!

I had compliments coming from all directions tonight, Robert said that I was fair flying along and doing a great job and looked like I was in my element (also asked if I was always like this - so busy - ha, with 3 kids, he doesn't know the half of it ;) ) Several of my classmates also complimented me on the design of my handles, one said that I must have put a lot of thought  in to it - I said that I hadn't actually - she said that I must just have a natural talent for these things! People were even asking ME for advice on using the equipment! Yikes!

So, whats next??

Next project is either a small shelving unit (which is rather useless to me) or a project of my own choosing, which I need to provide my own wood for.

I had a couple of things in mind: 
  • The first was a new letterbox as out old one has been rather spent since, I would wager, long before we moved in here. 
  • The second was a headboard, no, a PAIR of headboards - for the girls beds. Inspired from this Ana White plan. I was thinking I would modify it a little so that there was a little bit of a shelf for the girls to put a drink on, and they would both be King Single sized.
  • The third was a window seat for in the girls room. Not a built in one, but one that could be moved if necessary, like this plan, also from Ana White. Modified to make it with 4 cubby holes instead, so the girls each have 2 storage spaces of their own to use.
After having a bit of a look online to see where I could get baskets or similar from, I came across these wee fabric boxes that will be PERFECT for putting in the cubby holes :) So I have decided to go ahead and make the window seat. 

I have MDF sitting in the hall left over from Little Chalmers (new stuff, which I wasn't sure what I was going to do with, as well as some that has been used) which will do for the base, top (as it will be covered with a squab) and the upright dividers. I plan to use pine at the ends and as trim around the front and back edges (at the back around the top, I plan to create a bit of a lip to keep the squab on top from being pushed off all the time) and also to cover up the dividers at the front to make it look nicer than MDF.

I drew up a rough plan last night with some measurements etc on it. I guess it's almost time to go shopping for some wood!!